Web camera
Official PiKVM V4 Mini/Plus and PiKVM V3 devices have an exclusive webcam feature. With it, you can transfer an image from your local web camera to the remote host to use it for streaming, video calls, debugging, and so on.
The host sees the virtual camera as a completely ordinary USB device which doesn't require any special drivers. The maximum supported resolution at present is 1280x720.
If you also want enable a microphone for video calls and other applications, after this instruction, please follow here.
Limitations
By installing the ucamera (follows), you agree that it will be used only on official PiKVM V3 and PiKVM V4 devices.
We put a lot of effort into making this feature possible, so we want to keep it exclusive to PiKVM for a certain period.
After that, we will publish the full source code of ucamera under GPLv3.
Please note that this feature is in early access. Using the camera may cause PiKVM to fail. This is not fatal for PiKVM V3 and V4 since they have a robust hardware watchdog which reboot your device after a fail, but just remember that not everything can work perfectly.
If you encounter a problem, we will be glad to receive your bug report to fix it: use our support chat or GitHub Issues.
Enabling the camera
USB limitations
Each emulated USB device consumes a limited hardware resource called endpoints. On the default PiKVM, you can add only one or two of additional USB devices depending of its endpoint requirements.
See here to get more information about the endpoints, add devices and flexibly manage the configuration on the fly.
Also note that all USB devices uses the same USB identifiers as the keyboard, mouse and other stuff. You can change everything together, but not separately.
A recommended hardware modification for PiKVM V3
PiKVM V3 is a good old workhorse that was not designed for the kind of computing loads that the camera provides. It was released many years ago and was made for completely different requirements. However, we want V3 users to be able to enjoy our latest features as long as possible.
A cooling system fan is installed inside V3, but there is no radiator on the CPU since it was simply not needed.
Using the camera uses a lot of hardware blocks that we haven't used before, so in order to avoid potential overheating (if the fan is turned off or fails), we recommend buying and attaching additional heatsinks.
Both PiKVM V4 contains a good heatsink inside, so no modifications are required.
-
Perform OS update:
Updating PiKVM OS
Tip
We recommend updating PiKVM OS only if you have physical access to the device, or in the most extreme cases. The update process is very reliable, but there is always a small chance that something may go wrong so reflashing will be required. PiKVM cannot be bricked, but you need physical access to the memory card for this operation.
To update, run following commands under the
rootuser:[root@pikvm ~]# pikvm-updateIf you encounter an error like:
[root@pikvm ~]# pikvm-update
bash: pikvm-update: command not found
It's most likely you have an old OS release. You can update the OS as follows:
[root@pikvm ~]# rw
[root@pikvm ~]# pacman -Syy
[root@pikvm ~]# pacman -S pikvm-os-updater
[root@pikvm ~]# pikvm-update
Next time you will be able to use the usual method with
pikvm-update. -
Switch filesystem to RW-mode:
[root@pikvm ~]# rw -
Install
ucamerapackage:[root@pikvm ~]# pacman -S ucamera -
Add a config to
/etc/kvmd/override.yaml:otg: devices: camera: enabled: true -
Add parameter
gpu_freq=700to/boot/config.txton a separate line. -
Add parameter
isolcpus=3to/boot/cmdline.txtto the end of existing one-line, separate with a space. -
Perform reboot:
[root@pikvm ~]# reboot
Using the camera
To use the camera, you will need Firefox, Chrome, or Safari of the latest version, operability on old/other browsers is not guaranteed. If you use macOS, you will have to update macOS entirely to update Safari.
A camera is a device that is completely controlled by the host. The host tells it when to turn on the stream and what resolution should be used.
To receive audio in the PiKVM Web UI, go to the System menu and switch the video mode to WebRTC.
Before using the camera, you need to allow the PiKVM Web UI to access it.
Enable Multimedia switch and enable the Camera switch too. You can also choose a specific device.
The settings are saved in the browser's local storage.
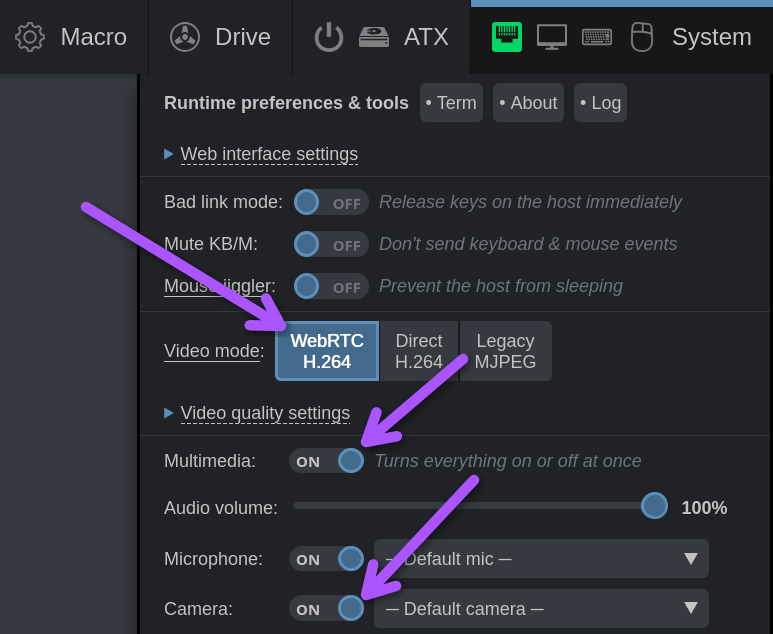
When the host asks the PiKVM device to provide it with an image, the stream will start.
Troubleshooting
-
If the stream is very unstable and dying, try “safe mode,” where the resolution is limited to 640x480 (and be sure to let us know about the problem):
[root@pikvm ~]# rw [root@pikvm ~]# kvmd-override --set otg/devices/camera/safe=true [root@pikvm ~]# reboot -
If the browser does not play sound or does not show multimedia submenu, try a different browser and/or incognito mode without extensions. Firefox and Google Chrome works best.
-
Check the log:
journalctl -u kvmd-janus -u ucamera. -
If nothing helped, please report about the problem to our support