Audio / Microphone
Official PiKVM V3 and PiKVM V4 Mini/Plus devices have an exclusive audio transmission feature, including two-way communication with microphone directly in the browser.
The incoming stream is captured from the target host via HDMI, the outgoing stream is transmitted to an emulated USB microphone. This brings the user experience of working with voice applications on the remote host even closer to the local one.
Note
Speakers (incoming audio)
-
On PiKVM V4 Mini and Plus, this feature is enabled by default, unless you didn't disable it with custom EDID.
-
On PiKVM V3, this is disabled for historical reasons so as not to break old user's configurations that was created before audio support was introduced.
Enabling audio on PiKVM V3
-
Make sure that you have not removed the audio jumpers (4) on the V3 HAT board and have not deleted or commented the
dtoverlay=tc358743-audioline in/boot/config.txt. Return everything as it was, if you changed it. -
Update OS and reboot:
Updating PiKVM OS
Tip
We recommend updating PiKVM OS only if you have physical access to the device, or in the most extreme cases. The update process is very reliable, but there is always a small chance that something may go wrong so reflashing will be required. PiKVM cannot be bricked, but you need physical access to the memory card for this operation.
To update, run following commands under the
rootuser:[root@pikvm ~]# pikvm-updateIf you encounter an error like:
[root@pikvm ~]# pikvm-update
bash: pikvm-update: command not found
It's most likely you have an old OS release. You can update the OS as follows:
[root@pikvm ~]# rw
[root@pikvm ~]# pacman -Syy
[root@pikvm ~]# pacman -S pikvm-os-updater
[root@pikvm ~]# pikvm-update
Next time you will be able to use the usual method with
pikvm-update. -
Enable the Basic Audio support in the EDID in the
/etc/kvmd/tc358743-edid.hexand reboot the device again:[root@pikvm ~]# rw [root@pikvm ~]# kvmd-edidconf --set-audio=yes [root@pikvm ~]# reboot
-
The target host determines whether it is possible to output audio via HDMI. Each OS does this in its own way. In general, make sure that the audio output is HDMI in the mixer. PiKVM supports stereo mode with any standard bits and frequencies like 32/44.1/48 kHz with 16/24 bit.
-
Mac OS usually understands the priority of HDMI for audio output on its own, but you can specify this explicitly in the settings.
-
Windows requires explicit specifying of the audio output device.
-
In Linux, everything depends on the distribution you use. In ancient times, the audio required performing a ritual dance under the full Moon. For now, a working Pipewire or Pulseaudio most likely be enough. Just specify HDMI as the audio sink in the mixer.
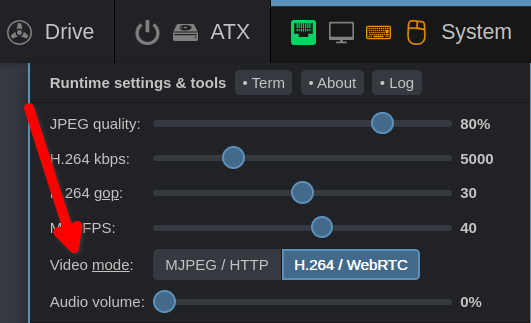
To receive audio in the PiKVM Web UI, go to the System menu and switch the video mode to WebRTC.
If everything is in order, the volume slider will appear. Set the volume to a non-zero value.
The video stream will restart and you should start hearing sounds from the target host.
If the volume slider is set to zero, then PiKVM does not accept the audio stream to save traffic, while the target host will still assume that the audio output to HDMI is available.
Besides, when the page is reloaded, the volume slider will be reset to zero. Saving this setting is not possible due to browser limitation that do not allow web pages to play audio immediately after opening without user activity to protect against annoying ads.
Microphone (outgoing audio)
PiKVM is able to emulate a USB microphone on the target host to transmit your speech from the browser to the host. This feature is disabled by default for backward compatibility reasons.
USB limitations
Each emulated USB device consumes a limited hardware resource called endpoints.
Short info: by default, you can add only one additional USB device.
To get more information about the endpoints, add more devices, and flexibly manage the configuration on the fly, see here.
Enabling USB Microphone
-
Microphone requires speakers support so check the previous paragraph. Also perform OS updating and reboot if you didn't:
Updating PiKVM OS
Tip
We recommend updating PiKVM OS only if you have physical access to the device, or in the most extreme cases. The update process is very reliable, but there is always a small chance that something may go wrong so reflashing will be required. PiKVM cannot be bricked, but you need physical access to the memory card for this operation.
To update, run following commands under the
rootuser:[root@pikvm ~]# pikvm-updateIf you encounter an error like:
[root@pikvm ~]# pikvm-update
bash: pikvm-update: command not found
It's most likely you have an old OS release. You can update the OS as follows:
[root@pikvm ~]# rw
[root@pikvm ~]# pacman -Syy
[root@pikvm ~]# pacman -S pikvm-os-updater
[root@pikvm ~]# pikvm-update
Next time you will be able to use the usual method with
pikvm-update. -
Switch filesystem to RW-mode:
[root@pikvm ~]# rw -
Add a config to
/etc/kvmd/override.yaml:otg: devices: audio: enabled: true -
Perform reboot:
[root@pikvm ~]# reboot
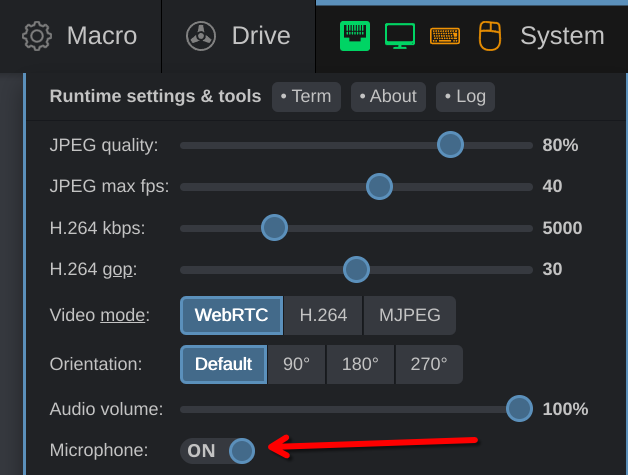
To receive and transmit audio in the PiKVM Web UI, go to the System menu and switch the video mode to WebRTC.
If everything is in order, the volume slider will appear with additional Microphone switch.
Set the volume to a non-zero value, next switch the mic switch.
Your browser will ask for permission to use the microphone, allow it.
The switch state will be saved in the browser's local settings. The microphone signal will not be transmitted if the volume level is zero.
USB compatibility
This feature is very new, so we don't know how much it affects the ability to interact with the BIOS and UEFI.
Please try this and let us know if you have lost the ability to access the BIOS or boot OS from PiKVM Mass Storage after turning on the USB microphone.
But even if this happens, don't worry. You can use the dynamic USB device control to temporarily turn off the microphone emulation.
Troubleshooting
-
If the browser does not play sound or does not show audio slider, try a different browser and/or incognito mode without extensions. Google Chrome works best.
-
Check the log:
journalctl -u kvmd-janus. -
If nothing helped, please report about the problem to our support