Video modes
PiKVM V3, V4 Plus/Mini and all DIY devices based on HDMI-CSI bridge provides three video streaming modes. This page explains the key differences between them and helps you to achieve optimal video performance.
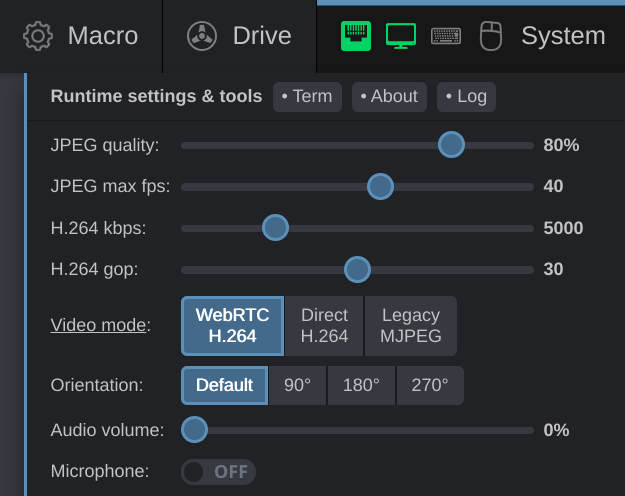
The video mode can be switched in the System menu in the Web UI. If you don't see the switch, probably your browser does not support H.264 video.
Quick tips
-
Good network: use
WebRTCorDirectmode, setH.264 gop = 0. -
Bad network and
WebRTCmode: SetH.264 gop = 60. -
Bad network and
Directmode: SetH.264 gop = 0. -
If the
WebRTCmode is not working, try theDirect. -
The
Directmode doesn't support audio yet. If you need audio, butWebRTCis not working, follow this guide.
Settings
-
H.264 kbps (Bitrate) - with a large value, the video quality will be better, but the network traffic will increase.
-
H.264 gop (Group of Pictures) - the number of frames between which a reference frame must be forcibly added. The recommended values are described above.
Boost PiKVM V4 to 60fps H.264
By default, the performance of PiKVM in 1080p mode is limited to 30fps, but this limitation can be lifted. The result will be a slightly lower video latency and a full 60fps stream with a slight increase in processor temperature (it's not critical for both V4 Plus and Mini, as they have a very good cooling system). It will also double the consumption of network traffic.
This is ONLY for PiKVM V4
Don't try it on DIY or V3 devices.
Enabling H.264 boost
-
Perform OS updating and reboot:
Updating PiKVM OS
Tip
We recommend updating PiKVM OS only if you have physical access to the device, or in the most extreme cases. The update process is very reliable, but there is always a small chance that something may go wrong so reflashing will be required. PiKVM cannot be bricked, but you need physical access to the memory card for this operation.
To update, run following commands under the
rootuser:[root@pikvm ~]# pikvm-updateIf you encounter an error like:
[root@pikvm ~]# pikvm-update
bash: pikvm-update: command not found
It's most likely you have an old OS release. You can update the OS as follows:
[root@pikvm ~]# rw
[root@pikvm ~]# pacman -Syy
[root@pikvm ~]# pacman -S pikvm-os-updater
[root@pikvm ~]# pikvm-update
Next time you will be able to use the usual method with
pikvm-update. -
Switch filesystem to RW-mode:
[root@pikvm ~]# rw -
Add
gpu_freq=700to/boot/config.txtas a separate line. -
Enable H.264 boost:
[root@pikvm ~]# kvmd-override --set kvmd/streamer/h264_boost=true -
Optional: change default FPS limit from 30 to 60 with following command:
[root@pikvm ~]# kvmd-override --set kvmd/streamer/desired_fps/default=60 -
Perform reboot:
[root@pikvm ~]# reboot
Please don't use the boost on PiKVM V3 and DIY devices.
WebRTC H.264 mode
This is the default mode. It'is using the efficient H.264 encoding to save traffic. The video is streamed over WebRTC protocol which you may have encountered when you used video calls in Discord or Google Chat. Since WebRTC does not use HTTP for video, establishing a connection is quite tricky (but PiKVM automates 99% of cases). If you have problems with the WebRTC mode, please check this guide.
Advantages / Disadvantages
-
✅ Supported by all modern browsers.
-
✅ Lowest latency, fast as hell with
H.264 gop = 0. -
✅ Provides two-way audio on PikVM V3 and V4 Plus/Mini.
-
❌ The video may be lost due to a poor connection (like mobile internet, bad Wi-Fi, etc.), or because of the router settings, when WebRTC is given low priority.
-
❌ It may be blocked at all in some networks.
Direct H.264 mode
The new experimental mode for real-time streaming, introduced by PiKVM. It also uses H.264 encoding, but streams the video over regular HTTP (WebSocket).
Advantages / Disadvantages
-
✅ Very stable on poor networks, better than WebRTC (based on our tests and user reviews).
-
✅ It is not blocked by firewalls because it appears to be regular HTTPS traffic.
-
✅ The latency is low and stable too.
-
❌ No audio support right now (but it will).
-
❌ Some older browsers doesn't have the WebCodes support needed for this mode.
Legacy MJPEG mode
Good old Motion JPEG. This is the way IP cameras have been streaming videos to browsers since ancient times.
The stream is just infinite queue of JPEGs that replace each other in <img> HTML tag.
There is no point in using it now if one of the previous modes is working.
Advantages / Disadvantages
-
✅ Sometimes the H.264 is disabled in a browser by OS license limitations (for example, in Red Had Linux or Debian). But MJPEG is working always.
-
✅ It is not blocked by firewalls because it appears to be regular HTTPS traffic.
-
✅ Low latency if you have a good network.
-
❌ No audio support.
-
❌❌❌ Consumes a HUGE amount of traffic. No Wi-Fi, no mobile, nothing but cable connection will work.
What if H.264 is not supported by browser at all
There are some Linux distro's that require more work to be able to use H.264, this may include any RedHat or Debian variant. Here some examples:
-
In case of Chromium on Fedora, you can connect the RPM Fusion repo and then install the
chromium-freeworldpackage instead ofchromium. -
On Debian GNU/Linux and Firefox, make sure the OpenH264 Plugin both exists and is enabled. Press
Ctrl+Shift+Ato open theAdd-on Manager, then pressPlugins. There you should see OpenH264 Video Codec provided by Cisco Systems, Inc. Make sure it is enabled by pressing the "more options" button (tree dots), then pressingAlways Activate.
Video recording
At the moment, it is not possible to record videos in a convenient way from the Web UI, but a small trick in the console can be used to record videos without sound. It's only available on all PiKVM models which support H.264 video.
Available since KVMD 4.110
Recording video from terminal on Linux or Mac OS
-
Install
ffmpegandwebsocat. -
Let's assume that your PiKVM is located on
https://pikvmand uses a self-signed certificate. Request the stream from it from the first opened console on your PC (not PiKVM):[user@host ~]$ websocat -k wss://pikvm/api/ws?stream=1 -H X-KVMD-User:admin -H X-KVMD-Passwd:admin -
Keeping the previous command running, open a new terminal and run the video recording process:
[user@host ~]$ websocat -b -B 10000000 -k wss://pikvm/api/media/ws?video=h264 -H X-KVMD-User:admin -H X-KVMD-Passwd:admin | ffmpeg -use_wallclock_as_timestamps 1 -i pipe: -c:v copy my_captured_video.mp4 -
Same can be done on PiKVM itself, locally.
-
Press
Ctrl+Cto stop the recording.
Take a screenshot from terminal on PiKVM
To take a screenshot, switch filesystem to RW-mode like in previous example and run the stream.
Next, take a screenshot:
[root@pikvm ~]# curl --unix-socket /run/kvmd/ustreamer.sock http://localhost/snapshot -o /tmp/screen.jpg