FAQ & troubleshooting
As a first step, we recommend carefully reading our documentation on GitHub or the updated documentation. Most steps to successfully set up your PiKVM are already described there.
If you run into any issues you can check this page which will list common errors. If that still doesn't help you you're welcome to raise an issue ticket or contact our Support for further help.
Common questions
Where can I get a memory card image for PiKVM?
See here: https://pikvm.org/download
Can PiKVM work on Raspberry Pi 5?
- Not now, but it will. Pi5 does not support hardware video encoding so there is no any reason to use it for PiKVM.
- RPi5 is not compatible with PiKVM V3 HAT due to the difference in form factor with RPi4.
Can I connect multiple servers to a single PiKVM?
Yes, but it requires additional work to set up. See this page.
How can I get the access to PiKVM in my local network over Internet?
You can use port forwarding for port 443 on your router if it has an external IP address. In all other cases, you can use the excellent free VPN service Tailscale, which can be configured on PiKVM with a few simple commands.
Can I assign a static IP to a PiKVM
Yes, we highly suggest using this document first for those that are not Linux savvy.
[ONLY FOR ADVANCED LINUX USERS]
Edit file /etc/systemd/network/eth0.network for Ethernet or wlan0.network for Wi-Fi and edit the [Network] section:
[Network]
Address=192.168.x.x/24
Gateway=192.168.x.x
DNS=192.168.x.x
DNS=192.168.x.x
Don't forget the /24 suffix (CIDR), otherwise it will not work and your PiKVM will become unreachable.
How can I disable IPv6 on PiKVM?
To do this, you need at least KVMD 3.301 installed on your device. If this is not the case, update the OS.
Next, append the ipv6.disable=1 parameter to /boot/cmdline.txt and perform reboot.
How do I recover my PiKVM, it cannot be reached now
- Take the USB-C end cable you have for your target and move to the PiKVM IOIO port or CON port
- Take the USB-A end cable and put this on the HOST(The controlling PC)
- Turn on or reboot your PiKVM, you should now see a COMx port on your HOST PC
- Connect using something like Putty, use 115200 as your baud rate
- Edit the file using nano or whatever text editor you are comfortable with, save the file
- Reboot your PiKVM, check for functionality
- If still unreachable, edit the same file to fix it
- ONLY Disconnect the IOIO port once you have fully recovered your PiKVM and place this back onto the Target system
Can I use PiKVM for gaming?
No, because:
- For HDMI-CSI bridge, bus bandwidth is not enough to transmit more than 1080p50.
- For HDMI-USB dongle, high latency and low video quality.
- General hardware video capture differs from software streaming and introduces additional latency.
Where does the cursor/video latency come from?
Can PiKVM do 4K video?
- For HDMI-CSI bridge, no. There is not enough bandwidth in the CSI bus for that much data. 1080p50 will max out the bandwidth.
- For the USB capture devices: technically yes, they will down sample to something smaller to meet the USB 2.0 bandwidth limitations, so the source may be 4k, but the stream will not.
- The 4K real-time video will not fit through the network anyway.
I am expecting to see 60fps and I am not, why?
PiKVM receives the entire signal, but then the encoding is the bottleneck depends of the device model.
PiKVM V4 is able to encode full 60fps with enabled H.264 boost.
PiKVM V3 and DIY can't process 60Hz and is only able to capture 50Hz, and they take every second frame to encode, so you get only 25fps. The reason why V3 and DIY does not encode 30 out of 50 is that the picture will be jerky, but smooth at 25.
Does PiKVM support sound?
Yes but the only officially supported version is the PiKVM V3+ devices, V2 we will attempt best effort but ultimately we do not support CSI modules or USB.
Can I power the Pi via PoE?
Yes!
For a POE HAT
You still need a splitter to ensure you isolate the 5v connection between the Raspberry Pi and host PC to prevent back power issues that can cause instability or damage to either the host PC or the Pi. Power/Data cable + USB power blocker would work.
For a POE Splitter
No, there is no need for anything additional, you can power your RPi and or the PiKVM Mini with the USB-C variant.
Do I need a USB splitter for data and power lines? Why do I need one?
-
This is the case of DIY PiKVM. You need a splitter to prevent backpowering from PiKVM to the host over the USB cable. See detauls here.
-
This is not needed if you have a PiKVM V3 and V4, as they splits USB power and data on the board.
Can I use PiKVM with non-Raspberry Pi boards (Orange, Nano, etc)?
Yes, but you will have to prepare the operating system yourself. For the PiKVM software, you will need to replace some config files (such as UDEV rules). If you are a developer or an experienced system administrator, you will not have any problems with this. In addition, we are open to patches. If you need help with this, please contact us via Discord (#unofficial_ports channel).
Is PiKVM OS its own custom distro?
No. PiKVM OS is an Arch Linux ARM with our own repository for KVM-related packages. We distribute OS images (that is, our Arch Linux ARM build) to simplify installation, since PiKVM requires some tuning of the OS and special partitioning of the memory card.
Why is PiKVM OS based on Arch Linux ARM and not Raspbian / Raspberry Pi OS?
There are several reasons:
- Several years ago, when PiKVM was just starting out, Raspbian didn't have a minimalistic image and the transition to systemd was in full swing, which is why the distribution was not too stable.
- Raspbian did not have all the necessary packages in the repositories to satisfy most software dependencies.
- PiKVM was born as a pet project, and the founder likes Arch the most.
However, we plan to provide an alternative OS image based on Raspberry Pi OS in the future - now it is quite stable.
Can I use an iPad on PiKVM?
- Yes, with the correct hardware you can control an iPad.
- In the opposite sense - yes, use VNC and use JUMP app (fully-featured but more expensive), or bVNC (cheap). RealVNC does NOT work.
How do I add my own SSL cert?
If you have a certificate (making a cert falls outside the scope of PiKVM - please reference OpenSSL documentation or use Let's Encrypt), replace keys in /etc/kvmd/nginx/ssl, edit /etc/kvmd/nginx/ssl.conf if necessary and restart kvmd-nginx service.
How do I emulate various USB devices on the target machine?
For a detailed description, see here.
Use the following USB database to get the desired devices: https://the-sz.com/products/usbid or https://devicehunt.com.
Can I run a desktop on PiKVM?
Yes, but it's strongly not recommended OR supported as this OS should be used in read-only mode and it will need read-write enabled all of the time, however if you insist on running one, instructions are here.
How do I blank the oled screen?
Please run the following:
# systemctl disable --now kvmd-oled kvmd-oled-reboot kvmd-oled-shutdown
# kvmd-oled --height=32 --interval=0 --clear-on-exit --text=x
# systemctl enable --now kvmd-oled kvmd-oled-reboot kvmd-oled-shutdown
How do I rotate the OLED display?
Please run the following:
1. mkdir -p /etc/systemd/system/kvmd-oled.service.d
2. Create file /etc/systemd/system/kvmd-oled.service.d/override.conf:
[Service]
ExecStart=
ExecStart=/usr/bin/kvmd-oled --height=32 --clear-on-exit --rotate=2
I am getting a 500/503 error when I try and access the main KVM page!
This maybe due to a few of the following:
- Missing
/etc/kvmd/override.yamlfile, to resolve it runrw; touch /etc/kvmd/override.yaml; ro - Bad YAML syntax, edit your
/etc/kvmd/override.yamlfile and undo what you did and restart PiKVM.
To validate your configuration run kvmd -M before reboot.
How can I use the serial console to gain access to other devices
You need to stop the service which listens on the /dev/ttyAMA0:
rw
systemctl stop serial-getty@ttyAMA0.service
If you want this change permanent (not starting again after reboot), you can disable this service, ('enable' to reverse this decision):
systemctl disable serial-getty@ttyAMA0.service
Note
- Only USB OR the RJ-45 serial connector will work, you can't use them together!
- If you disable the service permanently, you can't recover your device via serial console if you need this.
- There are some reports, that you need to remove
ttyAMA0from /boot/cmdline.txt, but this is not needed on new installations.
Can I run PiKVM in a docker?
No, technically it might be possible but the OS requires many specific settings that cannot be performed inside the container.
How can I change the HTTP/HTTPS ports?
To do this, you need at least KVMD 3.301 installed on your device. If this is not the case, update the OS.
Add some of these lines to /etc/kvmd/override.yaml:
nginx:
    https:
        port: 4430
    http:
        port: 8080
After that, restart the server: systemctl restart kvmd-nginx.
Can I control IR devices using PiKVM?
This goes far beyond the usual use of PiKVM, so there is no official way to do this, but there are some ways from the community that you can try if you know how to handle a soldering iron.
First steps
I can't find the PiKVM IP address in my network
Follow the device guide of your PiKVM here.
What is the default password? How do I change it?
See here.
How do I add another user?
See here.
How do I get root access in the web terminal?
See here.
Where is the PiKVM configuration located?
See here
I can't edit any file on PiKVM. Why is the system in read-only mode?
The PiKVM file system is always mounted in read-only mode. This measure prevents it from being damaged by a sudden power outage. To change the configuration you must first switch the filesystem to write mode using the command rw from root. After the changes, be sure to run the command ro to switch it back to read-only. If you get a message that the file system is busy, then the easiest way is to perform a reboot.
I want to get read-write filesystem all of the time
DON'T DO THIS
DON'T DO THIS
DON'T DO THIS
Seriously, DON'T. Read-only mode increases the life of the memory card and protects the filesystem from power loss failures. See the question above ^ ^ ^
You can turn it off, but don't say you weren't warned.
DON'T OPEN THIS SPOILER AND DON'T DO THIS
Okay, fine.
- Edit
/boot/cmdline.txtand change optionrotorw. - Do the same in
/etc/fstabfor the/bootpartition. - Comment
tmpfslines in/etc/fstabfor/var/liband/var/log.
But again: DON'T DO THIS
If you do plan on doing this, no assistance will be provided beyond this point other than the existing documentation.
How to set the date, time and timezone from command line?
- Become root with the command
su -orsudo -s. - Enable read/write with the command
rw. - Find your timezone string e.g.
timedatectl list-timezonesortimedatectl list-timezones | grep -i australia. - Set the timezone with
timedatectl set-timezone <YourTimeZoneHere>e.g.timedatectl set-timezone Australia/Victoria. - Stop the time syncing service with
systemctl stop systemd-timesyncdas this will prevent the next step if running. - Set the time and date with
timedatectl set-time 'YYYY-MM-DD HH:MM:SS'e.g.timedatectl set-time '2023-02-26 14:50:10'. - If you have hardware clock e.g. V3+, update it with
hwclock --systohc, then check it withhwclock --show. - Switch filesystem to RO-mode with the command
ro.
How do I update PiKVM with the latest software?
Updating PiKVM OS
Tip
We recommend updating PiKVM OS only if you have physical access to the device, or in the most extreme cases. The update process is very reliable, but there is always a small chance that something may go wrong so reflashing will be required. PiKVM cannot be bricked, but you need physical access to the memory card for this operation.
To update, run following commands under the root user:
[root@pikvm ~]# pikvm-update
If you encounter an error like:
[root@pikvm ~]# pikvm-update
bash: pikvm-update: command not found
It's most likely you have an old OS release. You can update the OS as follows:
[root@pikvm ~]# rw
[root@pikvm ~]# pacman -Syy
[root@pikvm ~]# pacman -S pikvm-os-updater
[root@pikvm ~]# pikvm-update
Next time you will be able to use the usual method with pikvm-update.
How do I install or remove packages in PiKVM OS?
PiKVM OS is based on Arch Linux ARM and uses the pacman package manager.
- Ensure the date is correct:
date. Otherwise you may get the errorSSL certificate problem: certificate is not yet valid - It is recommended to update the OS before installing new packages (see the tip upper ^^^).
- Switch filesystem to RW-mode:
rw. - Find some packages (
emacsfor example):pacman -Ss emacs. - Install it:
pacman -Syyto update local packages list andpacman -Su emacsto install. - Remove it:
pacman -R emacs. - Switch filesystem to RO-mode:
ro.
I don't need ATX functions. How do I disable this in the Web UI?
If you don't need ATX power control you can disable the relevant Web UI menu in /etc/kvmd/override.yaml:
kvmd:
    atx:
        type: disabled
... then restart kvmd:
# systemctl restart kvmd
How do I disable the web terminal?
# rw
# systemctl disable --now kvmd-webterm
# ro
How do I completely disable authorization in PiKVM?
See here.
Can I have different hostnames for each of my PiKVMs?
Yes! And it's easy to do. Using a SSH session or the web terminal:
[root@pikvm ~]# rw
[root@pikvm ~]# systemctl restart systemd-hostnamed
[root@pikvm ~]# hostnamectl set-hostname yournewhostname.domain
[root@pikvm ~]# reboot
Why not add software support for another codec?
Encoding is a heavy process and will add significant latency, its best to have hardware support to avoid additional latency.
Video problems
I can see the video but I can't see the WebRTC / video mode switch
WebRTC and Direct H.264 modes are only available on V2+ platforms with HDMI-CSI capture device, including PiKVM V3 or V4 Plus/Mini. See the modes guide to solve any problems.
PiKVM does not show the video from the computer at all
- Double-check that the video capture device is connected correctly.
- Some laptops do not output any signal until you switch the output (usually via the FN + and an F5 key on the keyboard).
- Your computer may have turned on sleep mode for the monitor. Move the mouse to turn it off.
- For windows you might need to check for the active signal resolution. To change the active signal resolution you have to go to Settings>System>Display>Advanced display settings>Display adapter properties then, click "List All Models" and choose the one you want. Keep trying different Hz settings.
The video works in the booted OS, but not in the BIOS/UEFI
This problem appears on Intel NUC, GA-H77-DS3H, and some other devices when using a CSI bridge. All you need to do is change the EDID data. This is the information about supported resolutions that the CSI bridge reports to your computer.
Glitchy or wrong BIOS/UEFI resolution
On some motherboards, the BIOS may be displayed at a lower resolution, or with some rendering issues/glitches, specially on newer ASUS ones. Like this:
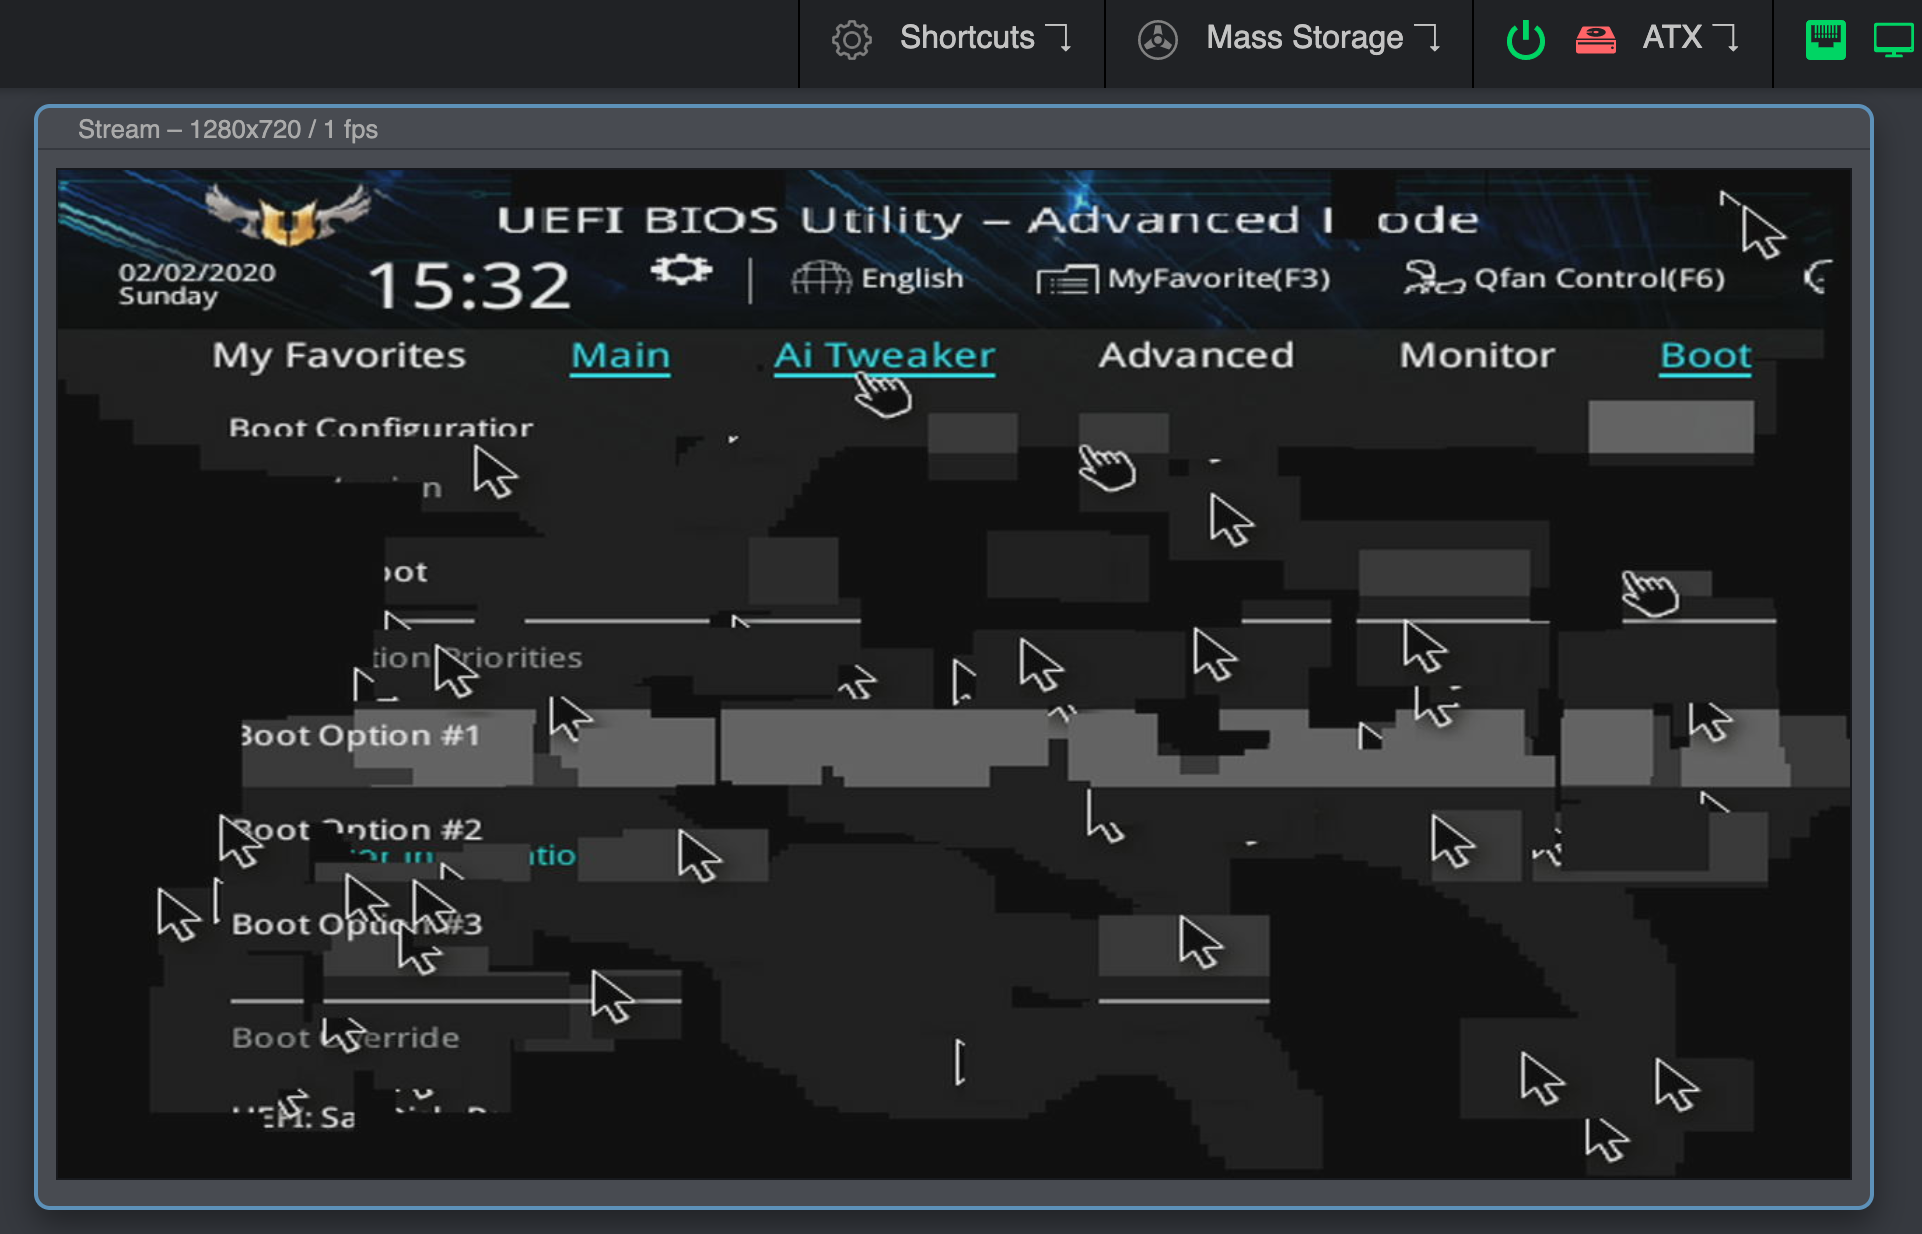
This can be solved by enabling the Compatibility Support Module (CSM) in your BIOS, usually under the Boot options.
If you can't or don't want to enable the CSM, you can try connecting a DisplayPort (DP) monitor, or a dummy plug. If you remove the DP cable/adapter the bug will reappear.
If none of this works, try connecting the DP cable first, boot into the BIOS, disable the CSM and shutdown (do not restart) your PC. Then, boot into the BIOS and enable the CSM before shutting down your PC. Then connect the HDMI and turn your PC on again.
There is no video in GRUB2, but there is before and after
Sometimes this can be caused by the specifics of the BIOS/UEFI and how GRUB2 works with video.
This can be solved by enabling the Compatibility Support Module (CSM) in your BIOS, usually under the Boot options. The video mode will be located in the same section. Switch the Video mode from UEFI to Legacy.
Why does the CSI bridge does not work with official Raspberry Pi PoE HAT?
Details here. The reason is that the official HAT has a built-in fan controller that conflicts with the TC358743 chip of the bridge. The solution is to disable the fan control and connect the fan to the power line so that it works continuously. To turn off the controller you need to add the line disable_poe_fan=1 to /boot/config.txt.
The video freezes a few seconds after the start, restarting the Web UI or VNC does not help
The story is here. Very very rarely, Raspberry Pi boards can have a hardware defect that causes some of the chip blocks to be unstable under normal power. The solution is to slightly increase the power supply, as you would when overclocking. Add over_voltage=1 (or over_voltage=2 if previous doesn't help) to /boot/config.txt and perform reboot.
To make sure that you are facing this particular problem, first perform a diagnostic:
- Boot the PiKVM without the specified options.
- Open Web-UI and wait for freezing.
- Click
System -> Reset Stream. - Click
System -> Open logand make sure that the log contains messages likeH264: Can't wait for the VCOS semaphore. - Make sure that the last message from ustreamer was
H264: Configuring MMAL encoder(not counting messages about connecting and disconnecting stream clients).
No image from computer with Linux + Awesome WM
Sometimes Awesome WM on Linux can't recognize a video output change on a cable. That is, if the cable was first inserted into the monitor, and then you reconnected it to PiKVM - it may happen that you will not see the image. It seems that the problem is Awesome WM, since for example with KDE, it is not reproducible. If you turn on your workstation with PiKVM already connected, everything will work fine.
Windows shows limited Available Resolutions
This is due to a driver issue. A possible resolution can be found here.
Firefox ESR from the Debian repo shows the black screen in H.264 mode
Make sure the OpenH264 Plugin both exists and is enabled (known issue on Debian GNU/Linux). Press Ctrl+Shift+A to open the Add-ons Manager, then press Plugins. You should see OpenH264 Video Codec provided by Cisco Systems, Inc.. Make sure it is enabled by pressing the "more options" button (3 horizontal dots), then pressing Always Activate.
Apple TB/USB-C HDMI video doesn't work
A possible solution can be found here.
I am seeing a NO SIGNAL, what can I do?
If you are using PiKVM V2 or a V3, you need to ensure that your target is using the maximum resolution 1920x1080@50Hz, 60Hz will not work.
If you are using the PiKVM V4, ensure that you are getting a signal out from the target by using a physical monitor using the same exact cable/dongle, ensure that you are using the maximum resolution 1920x1200@60hz, 2K/4K resolutions will not work.
USB problems (keyboard, mouse, mass storage, etc)
My computer does not recognize USB of PiKVM V2+ at all
- Make sure that you have used the correct USB cable with DATA lines to connect the OTG port for the Raspberry to the computer. You may have decided to use a USB hub instead of a Y-cable and it won't work. Use good cables and follow the instructions :)
- In rare cases, some very buggy BIOS's do not like HID and Mass Storage in one USB device. You can either disable Mass Storage, or use the Pico HID to physically separate them.
BIOS/UEFI does not recognize USB of V2+, but computer does
If you are using a USB hub or USB PCI controller, this may not be handled by your BIOS. Try to use another USB port. Some ports may have a built-in hub on the motherboard and a buggy BIOS that can't handle it.
My keyboard works in BIOS/UEFI, but my mouse does not
The BIOS does not support absolute mouse mode, which is preferred by PiKVM. In this case, you can enable relative or dual positioning mode.
My mass storage drive works (I can boot an image from PiKVM V2+), but my keyboard/mouse does not
In rare cases, some very buggy BIOS's does not like HID and Mass Storage in one USB device. You can either disable Mass Storage, or use the Pico HID to physically separate them.
The mouse does not work with NVR/DVR CCTV
Often these devices have a buggy USB driver that does not understand an absolute mouse and/or a mouse with horizontal scrolling. In this case, the following configuration for /etc/kvmd/override.yaml will help you:
kvmd:
    hid:
        mouse:
            absolute: false
            horizontal_wheel: false
        mouse_alt:
            device: ""
It will make the relative mouse without horizontal scrolling the only mice.
There's big mouse latency on another Raspberry Pi as managed server
Unusual case: RPi4 is used as a PiKVM to control RPi3. In this case, the mouse delay may be several seconds. To fix it, append usbhid.mousepoll=0 to the boot line in /boot/cmdline.txt on the managed server (i.e. RPI3 in our case) and reboot it. Source.
What speed is the USB OTG port?
Per the official RPI documentation, this is a limitation of the SoC. The OTG port is only USB2.0, so is limited to 455 Mbit/s.
On MacOSX, my mouse/keyboard does not work!
There are a few fixes the community has suggested:
If using a USB-C to USB-C cable, you need to use the included USB-C to USB-A cable then use a USB-A to USB-C adapter
You may need to allow new accessories to connect. Source
Web UI problems
Chrome reports a Certificate Issue when I try to access the PiKVM web interface
The latest versions of Chrome do not allow access to the page with a self signed certificate, so if you see the following screen when loading the PiKVM website:
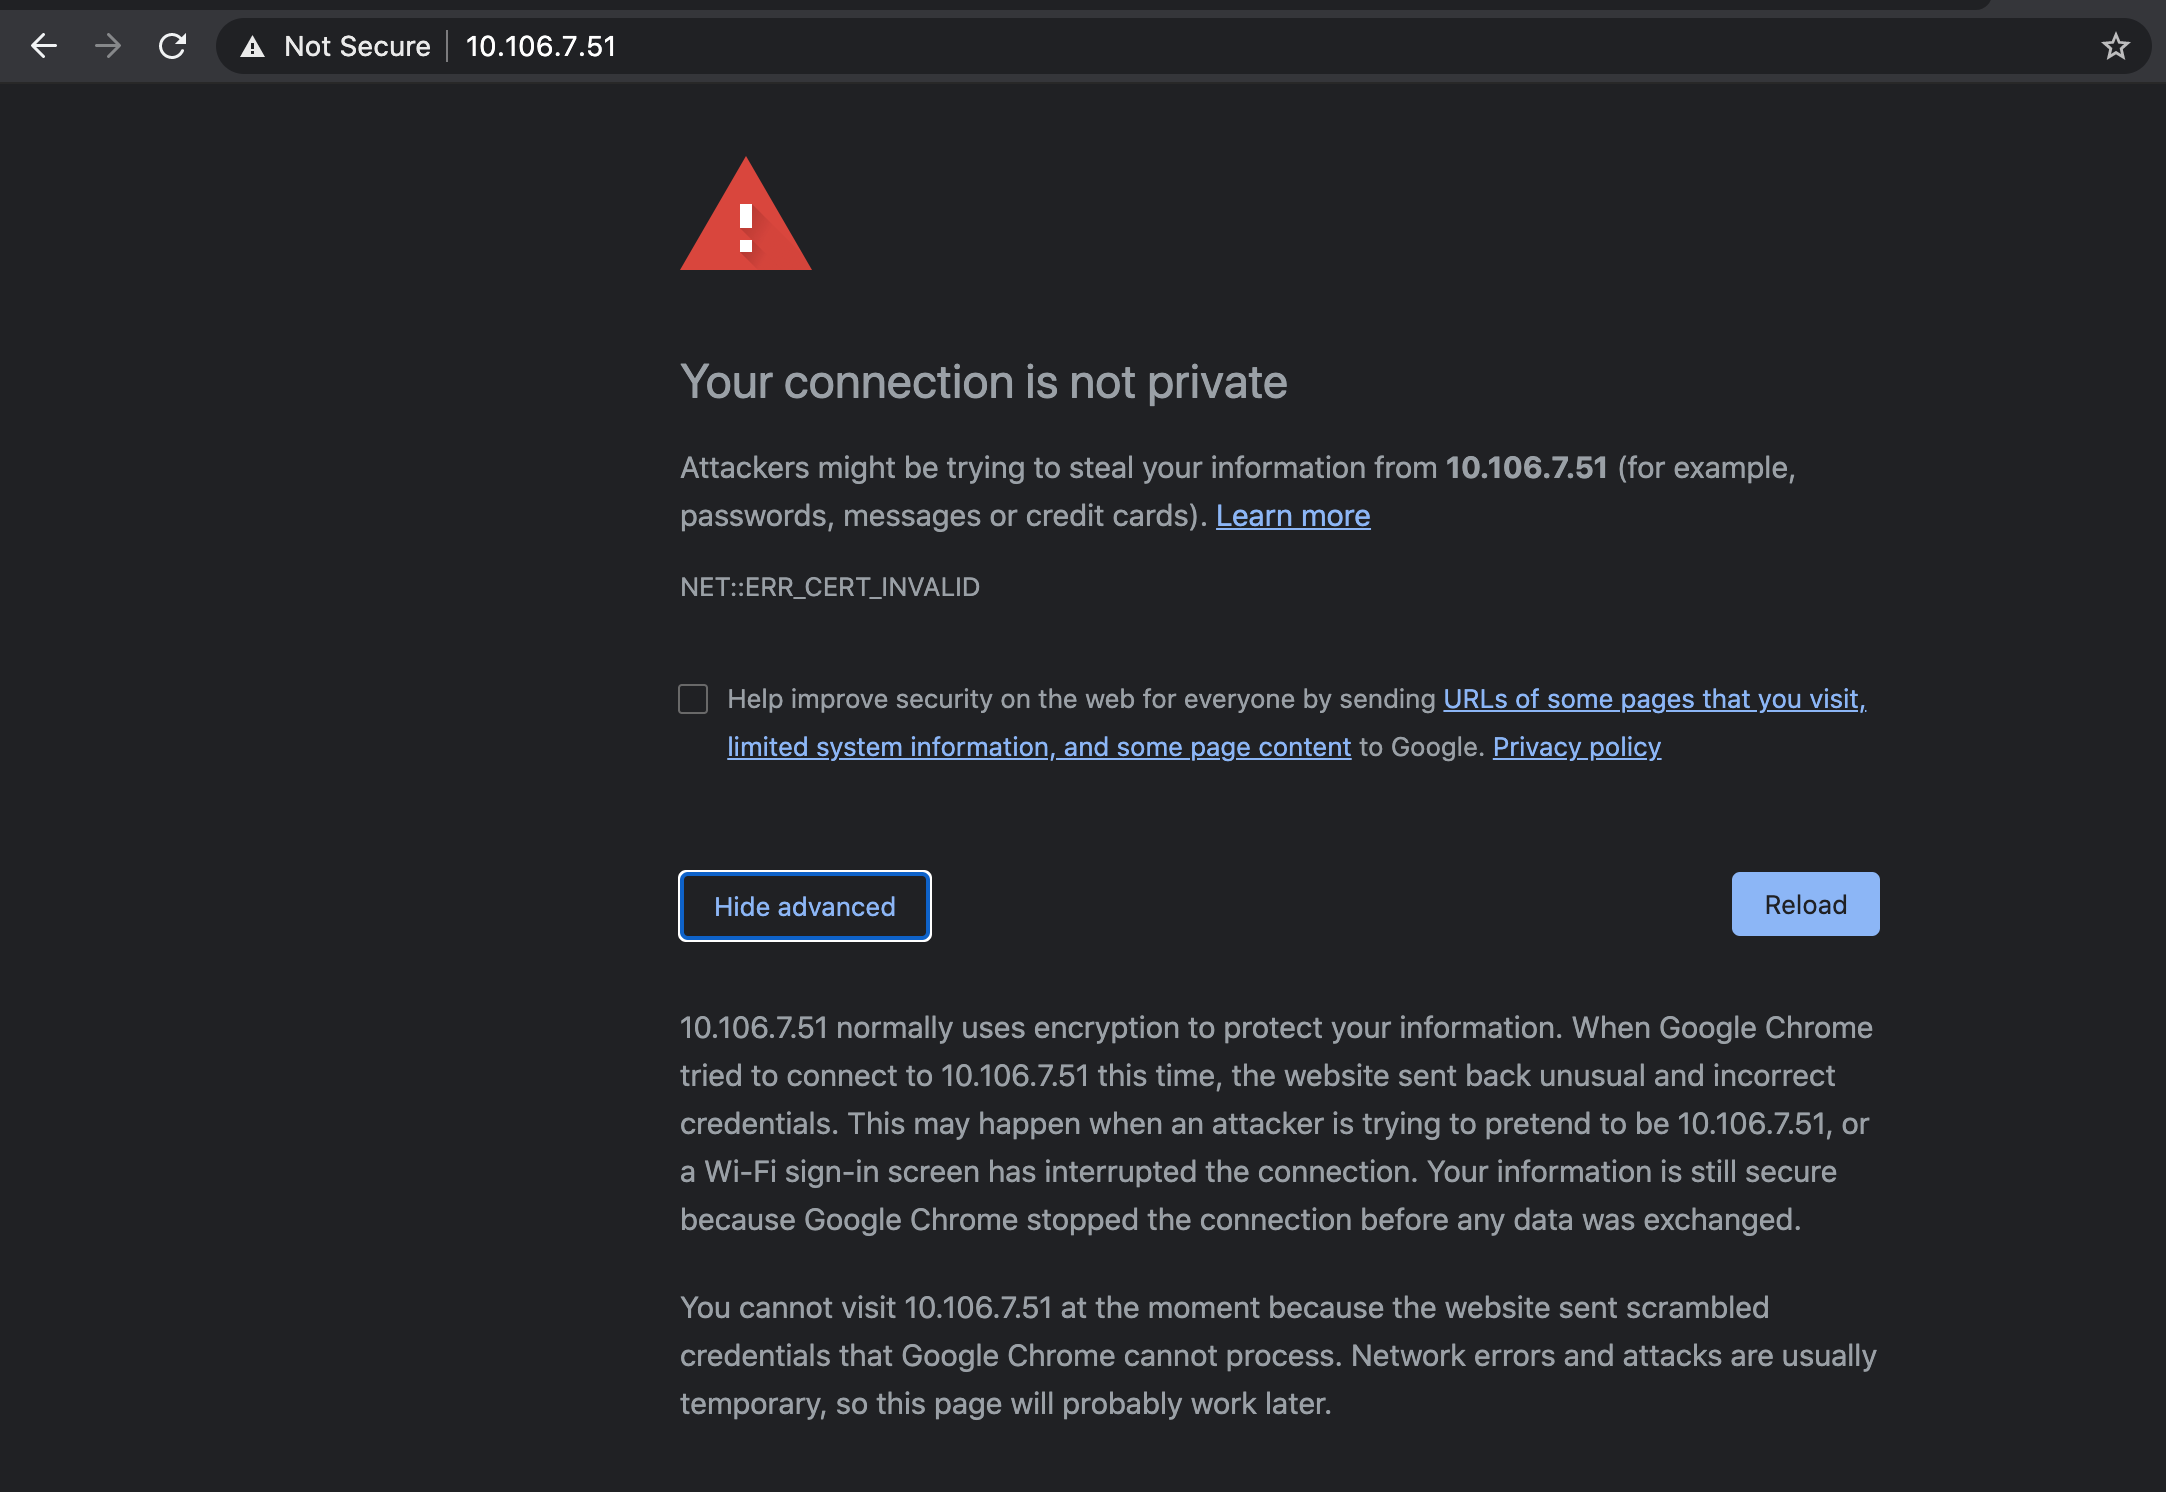
You can proceed by typing thisisunsafe and Chrome will then load the page. Also see Let's Encrypt page.
Pressing ESC in full screen mode causes the PiKVM page to close
Your browser does not support keyboard lock. Right now (January 2022), only Chromium implements this, so it works on Chrome, Edge, and Opera.
The Web UI doesn't work properly in Firefox while it works fine in Chrome
This might be related to your specific hardware combination or browser hardware acceleration. Try disabling hardware acceleration in Firefox or updating your GPU and chipset drivers.
Unexpected interruption while loading the image for Mass storage drive
If problems occur when uploading even a small disk image it may be due to unstable network operation or antivirus software. It is well known that Kaspersky antivirus cuts off PiKVM connections during uploading, so you should add the PiKVM website to Kaspersky's list of exceptions or not filter web requests with the antivirus. Antivirus programs can also affect the performance of certain interface elements, for example the quality slider. For Kaspersky, the steps to add the network address of PiKVM's website to the exclusion list is: Protection -> Private browsing -> Categories and exclusions -> Exclusions.
I can't click on anything when using the WebGUI on my phone
At this time, iOS has the buttons on the bottom if you have the correct resolution, sometimes you cannot see them due to the resolution. At this time, android is not supported, our suggestion is to use a VNC client.
I changed the Display Resolution to 720p but Windows still shows 1080p and the display looks blurry
This is mostly seen on Windows, open Display Settings -> Advanced display settings -> Display adapter setting for Display 1 -> List all modes -> (Toggle between 720p30hz back to 50hz), this may need to be done if you need to change it back for 1080p.
Hardware problems (Wi-Fi, ATX, etc)
I can't connect to Wi-Fi on a Raspberry Pi Zero W
- Some Zeros contain a defective Wi-Fi chip. You can either return the device to the store, or try the software workaround.
I can't connect to Wi-Fi at all!
-
If your device is unable to connect to the Wi-Fi network that you have set up, check the 2.4 GHz Wi-Fi channel used by your Wi-Fi access point.
-
If channels 12 to 14 are used (some countries have banned these channels) try to use a channel between 1 and 11.
LEDs/Switches do not work in ATX control
Double check your wiring. Make sure you placed the relays (G3VM-61A1) in the correct orientation. The relays for switches (Power, Reset) have a different orientation than the ones for LEDs.
My PiKVM keeps disconnecting from the Wi-Fi network
Try to edit /etc/conf.d/wireless-regdom and look for your region and uncomment it. For example: WIRELESS_REGDOM="US".
PiKVM complains about low power warnings
- Are you using a "proper" power supply? Not one you hacked together?
- Some USB power bricks advertise 5V 2.1A or higher, but can't deliver consistent 5V. Best to use Raspberry Pi Foundation recommended power supplies.
PiKVM complains about a RTC low voltage detected, date/time is not reliable
- This is mearly a warning that can be ignored however, the following resolves the issue:
- Leave plugged in for 24+ hours and or
- Connect to the internet using the eth cable, the internal NTP service will set the time accordlingly
- Force a time sync:
rw && hwclock --systohc"or"rw && hwclock -w" - Set date and time manually can be found here.