PiKVM Cheat Sheet
Here are first steps guides for each PiKVM device:
Basics
Performing commands with root privileges
There are two ways to perform any command with root privileges.
-
Gain root privileges, then perform any command.
[kvmd-webterm@pikvm ~]$ su -After providing root account password, you will be able to run any commands as a root user as long as the session is running. Use it wisely. For example, if you need to reboot PiKVM, all you need to do is this:
[root@pikvm ~]# rebootThe use of
su -applies to both SSH and web terminal sessions. -
Use
su -cfollowed by the command wrapped in apostrophes. This will perform the command with root privileges a single time, you will not gain permanent root access. This will For example, to reboot PiKVM, do this:[kvmd-webterm@pikvm ~]$ su -c 'reboot'The use of
su -capplies to both SSH and web terminal sessions.
Changing PiKVM Passwords
PiKVM comes with the following default passwords:
-
Linux OS-level admin (SSH, console...):
- Username:
root - Password:
root
- Username:
-
KVM user (Web Interface, API, VNC...):
- Username:
admin - Password:
admin - No 2FA code
- Username:
They are two separate accounts with independent passwords.
To change passwords, you will need to use the console access via SSH or the Web Terminal.
If you are using the Web Terminal, enter the su - command to get the root access (enter the root user password).
[root@pikvm ~]# rw
[root@pikvm ~]# passwd root
[root@pikvm ~]# kvmd-htpasswd set admin
[root@pikvm ~]# ro
If you require additional user for the Web UI access, use the following:
[root@pikvm ~]# kvmd-htpasswd add <user> # Add a new user with password
[root@pikvm ~]# kvmd-htpasswd del <user> # Remove/delete a user
Optionally you can enable the two-factor authentication for more security.
Changing the VNCAuth key and IPMI password at the first start of PiKVM is not required, since these services are disabled by default. But it is here just so that you remember their existence.
Configuring PiKVM OS
Need more info? We have it!
The following is a brief guide to configuring PiKVM. For more information (including the basics of YAML syntax and how to use a text editor in the Linux console), please refer to this page.
Most of the PiKVM configuration files are located in the /etc/kvmd directory.
The /usr/lib/kvmd/main.yaml file defines the platform configuration, and you should never edit it.
To redefine system parameters use the file /etc/kvmd/override.yaml.
All other files that are also not recommended for editing have read-only permissions.
For automated deployment, you can put .*yaml files into /etc/kvmd/override.d directory.
The override.yaml file definitions takes precedence over the override.d directory
and it is intended for local manual configuration.
A complete list of all parameters can be viewed using the kvmd -m command.
A list of your non-default overrides can be viewed using the kvmd -M command.
Files with the *.yaml suffix uses the YAML syntax
and describes a parameter tree with key-value pairs of different types.
To define the parameters within one section, an indent of 4 spaces is used.
Comments starts with the # symbol.
Only 4 spaces should be used for indentation
Be careful when editing YAML and follow this rule. Invalid indentation or tabs instead of spaces will cause an error when starting the services.
Sections under the same keys should be merged:
-
Wrong:
kvmd: gpio: drivers: ... kvmd: gpio: scheme: ... -
Correct:
kvmd:
    gpio:
        drivers: ...
        scheme: ...
For simple config overrides you don't need to use a text editor, you can do this with kvmd-override command.
For example, enabling the microphone audio on PiKVM V3/V4:
[root@pikvm ~]# kvmd-override --set otg/devices/audio/enabled=true
This puts a config override looks like this:
otg:
    devices:
        audio:
            enabled: true
In the /etc/kvmd/meta.yaml file you can specify some information regarding this PiKVM installation in an almost free YAML format.
Updating PiKVM OS
Tip
We recommend updating PiKVM OS only if you have physical access to the device, or in the most extreme cases. The update process is very reliable, but there is always a small chance that something may go wrong so reflashing will be required. PiKVM cannot be bricked, but you need physical access to the memory card for this operation.
To update, run following commands under the root user:
[root@pikvm ~]# pikvm-update
If you encounter an error like:
[root@pikvm ~]# pikvm-update
bash: pikvm-update: command not found
It's most likely you have an old OS release. You can update the OS as follows:
[root@pikvm ~]# rw
[root@pikvm ~]# pacman -Syy
[root@pikvm ~]# pacman -S pikvm-os-updater
[root@pikvm ~]# pikvm-update
Next time you will be able to use the usual method with pikvm-update.
Connecting to PiKVM via SSH
SSH is the most common remote access method in the Linux world. Normally, it should be possible to simply run ssh root@pikvm in a terminal window to connect to your PiKVM. However, this can fail for various reasons. In that case, you will have to connect using PiKVM's IP address.
To connect to PiKVM via SSH, do this:
-
Discover PiKVM's IP address in the local network. There are several ways to do that:
- Open the web interface of your router and find the list of issued IP addresses there.
- Linux-only: install and run arp-scan:
sudo arp-scan --localnet. - Linux, MacOS, Windows: Download and run Angry IP Scanner.
- Windows PowerShell: Use the
arp -acommand.
In each case, look for the entry that says "Raspberry Pi Trading Ltd" and copy its IP address to the clipboard. Let's assume that the IP address is
192.168.0.100. -
Run the SSH client to connect to PiKVM:
- Linux, MacOS: Open any terminal application and run:
ssh root@192.168.0.100. - Windows: Use PuTTY for this.
- Linux, MacOS: Open any terminal application and run:
-
Submit your
rootuser credentials. The default password isroot. If you haven't changed it, you absolutely should do it. -
You should now be able to see and interact with the serial port. All the system tools in PiKVM will be available in the terminal window. Once you are done, type
exitand press Enter, or simply press Ctrl+d to terminate the session.
Connecting to PiKVM via serial console
A serial console is a convenient and fast way to connect to PiKVM when there is no network, or get boot logs and a console if something goes wrong.
-
Connect to the physical universal asynchronous receiver / transmitter (UART) console from your host computer:
-
On PiKVM V3 or V4, you have a built-in USB-UART adapter in your device. Just disconnect the OTG cable and place the USB-C end into the
IOIOIport on V4 (or theCONport on V3). Place the USB-A end into the port you want serial to be accessed, typically done on the host. If you have a Windows host, you may need to install this driver, other operating systems may not need one. -
On DIY PiKVM V1 or V2, you'll need to get the right TTY to USB cable, we recommend the RPi Debug Probe and follow existing RPi TTY serial setups.
-
-
Install
picocomon a Linux or a macOS host (available in Homebrew and MacPorts), or Putty on Windows. -
Identify the port that your operating system exposes for connecting to the PiKVM.
-
Windows: look this up in the Device Manager
-
Linux: open a terminal program, run
sudo dmesg | grep ttyand look for a message like this:
[14362.388405] usb 1-2: cp210x converter now attached to ttyUSB0This means you will need to use
/dev/ttyUSB0.- macOS: open the terminal and list all USB serial devices with
ls /dev/cu.usbserial-*. Look for a device that containscu.usbserial, e.g./dev/cu.usbserial-FT0RVWSW.
-
-
Connect via the serial port:
-
Windows: select the COM port in Putty and use the 115200 baud rate, then connect.
-
Linux/macOS: open your terminal program and run
sudo picocom -b 115200 $USB_SERIAL_DEVICEwhere$USB_SERIAL_DEVICEis the device you looked up, e.g./dev/ttyUSB0on Linux or/dev/cu.usbserial-FT0RVWSWon macOS.
After running the command, press Enter to get to a login prompt.
-
-
Submit your root user credentials.
-
You should now be able to see and interact with the serial port. All the system tools in PiKVM will be available in the terminal window. Once you are done, press Ctrl+a and then immediately Ctrl+x to terminate the session.
Shutting down PiKVM
PiKVM defaults to using the system in read-only mode, so there is no need to explicitly shut it down. You can simply unplug the device from power.
If you absolutely need to use the shutdown command, please ensure the following requirements are met:
- This is not one of the DIY (V1 or V2) devices. If you shut down a DIY PiKVM, it will not power on until you physically reconnect the power cord.
- You are not currently running a system update. If you are, you will likely corrupt the system.
- You are not currently uploading a mass storage drive image. If you are, you will likely corrupt the system.
If all these requirements are met, do this:
[kvmd-webterm@pikvm ~]$ su -
[root@pikvm ~]# shutdown -h now
PiKVM V3 and V4 will automatically reboot after several minutes of being halted. DIY PiKVM will need a power cord reconnection to become available again.
Sending keyboard shortcuts to target host systems
Operating systems deal with modifier keys differently, so it's difficult to get the same user experience across all possible target hosts. This is why PiKVM uses a keyboard shortcuts system built around these three concepts:
- Magic key. A special-purpose key, typically the one you use the least when you connect to a remote target host. A good example is the right
Shiftkey for right-handed people. - Modifier keys. Typically, it's e.g.
Ctrl,Alt,Cmd, etc. - Non-modifier keys. These are all the other keys on your keyboard: alphanumeric keys, function keys,
Backspace,Del,Esc, andEnter.
Sending a shortcut
When you press a magic key, the web UI starts accumulating a sequence of modifier keys you press, for example, Ctrl Left and Alt Left in Ctrl+Alt+Del, and displays a guiding overlay:
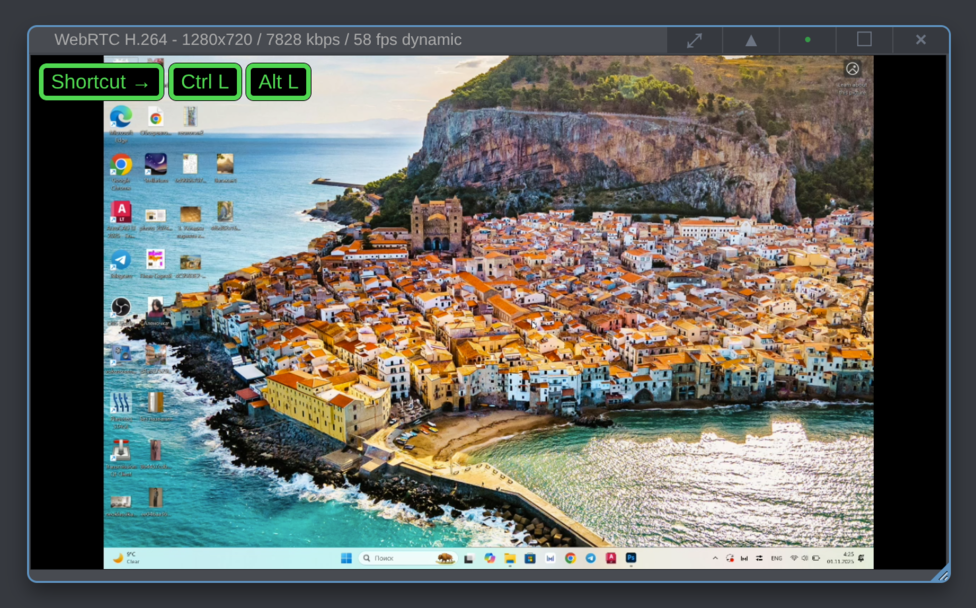
As soon as you press one non-modifier key, the web UI stop accumulating keys and sends the entire sequence of the keys you pressed to the target host system.
Let's send a Ctrl+Alt+Del shortcut to the target host running Windows. Here is the correct sequence of actions:
- Press and release the magic key.
- Press and release
Ctrl. - Press and release
Alt. - Press and release
Del.
Here is another example. Let's send a shortcut to a host system running macOS to open the Force Quit Applications window:
- Press and release the magic key.
- Press and release
Command. - Press and release
Option. - Press and release
Esc.
Using multiple non-modifier keys in one shortcut
In some cases you may need to press a non-modifier key two or more times. A common example is cycling through the list of opened windows using Alt+Tab. To achieve that, use the alternative behavior where non-modifier keys are continuously sent as you press them:
- Press and hold the magic key.
- Press and release
Alt. - Press and release
Tab← at this point the target host system will display a list of windows to choose from. - Continue pressing and releasing
Tabuntil you get to the right window. - Release the magic key.
Overriding the desktop environment
Some desktop environments claim modifier keys for themselves, so those keys can't be used in a shortcut. For example, if you are trying to open the Start menu on a host Windows-based system using the Win key and you do it from GNOME on Linux, PiKVM web UI will not register the Win key press. Instead, your local GNOME environment will show an overview of locally opened windows instead.
To override that, you can use the alternative behavior outlined above. Let's say you need to minimize all windows and show the desktop on a target host running Windows. Do this:
- Press and hold the magic key.
- Press and release
Win. - Press and release
D. - Release the magic key.
PiKVM will send Win+D to the target host system which will minimize all windows.
Using shortcuts with just the modifier keys
Some shortcuts don't use non-modifier keys at all. For example, Ctrl+Shift and Alt+Shift commonly change the keyboard layout, and Win opens the Start menu on Windows. This means you need to tell the web UI to stop accumulating modifiers and send what you have already pressed to the target host. To do that, simply press the magic key twice without a pause.
For example, to open the Start menu on Windows:
- Press and hold the magic key.
- Press and release
Win. - Release the magic key.
- Quickly press and release the magic key twice.
PiKVM will send Win to the target host system which open the Start menu.
Setting up a magic key
You can define which key to use as the magic key. Follow these steps:
-
In the web UI, open the System menu.
-
Click on the drop-down list next to Shortcuts magic.
-
Select the key the you will use as the magic key.
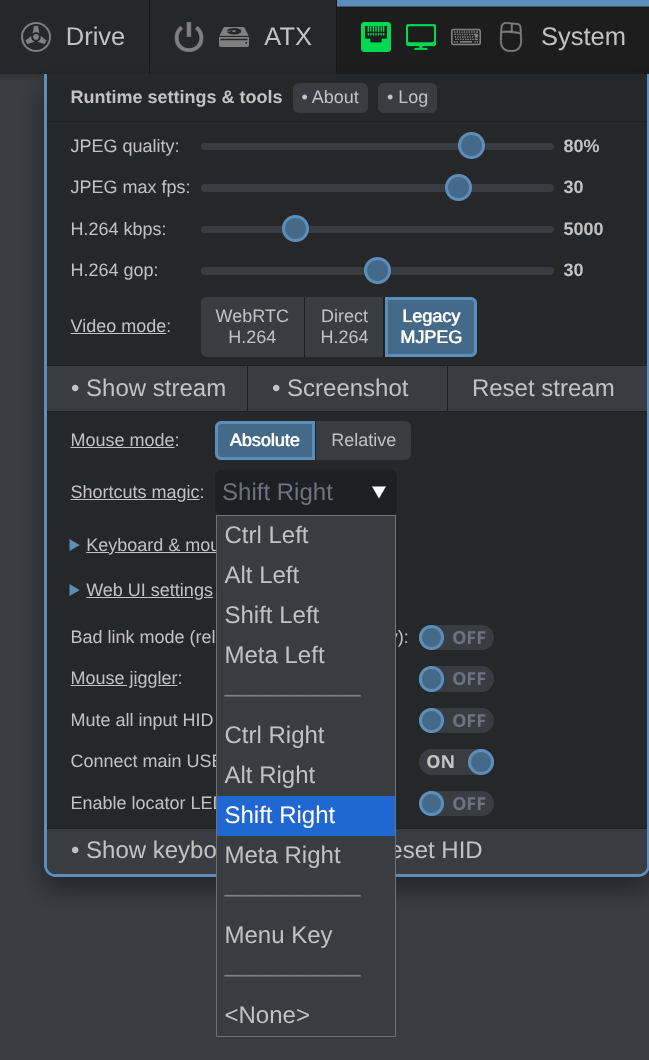
PiKVM defaults to Ctrl Right on all major desktop systems, but the list of available keys is platform-specific:
- Windows:
Ctrl,Alt,ShiftandMenu. - macOS:
Ctrl,Option,ShiftandMenu. - Linux:
Ctrl,Alt,Shift,MetaandMenu.
Getting User Support
If something doesn't work, check out our FAQ. Otherwise, head straight to our Support.